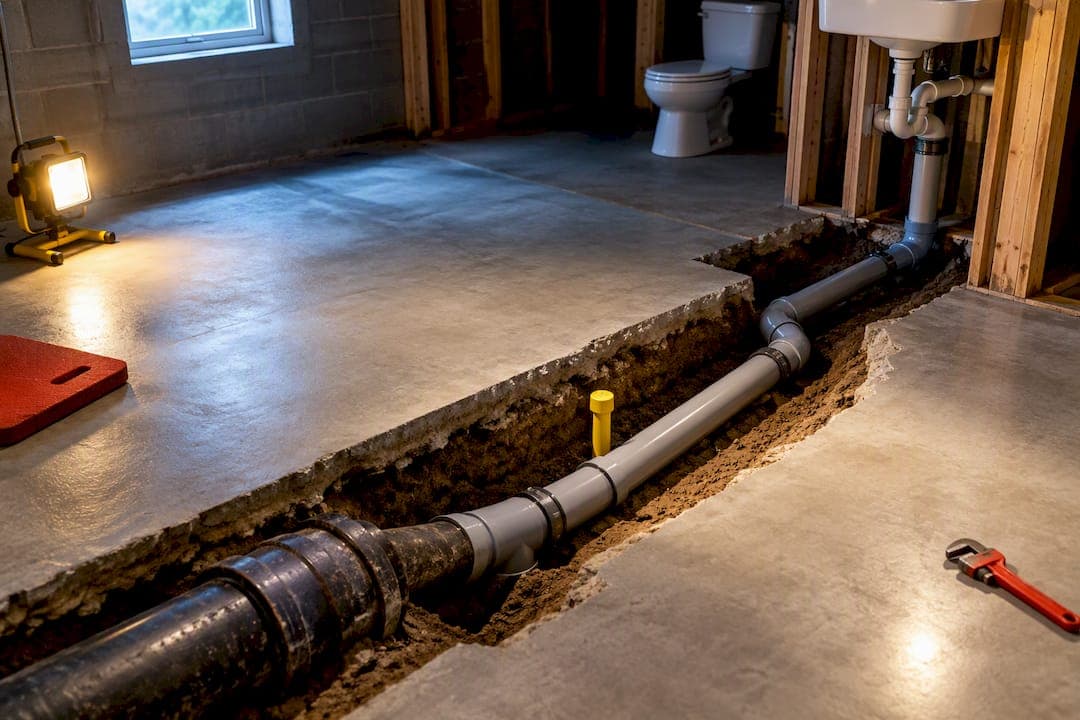
A basement bathroom typically runs $200 to $250 per square foot to convert existing space, with a full project often landing between $3,000 and $12,500 for a small footprint. The single biggest swing factor is whether a rough-in already exists below the slab. When drainage has to be pumped up to the main line, expect an ejector system to add $2,000 to $5,500 on top of that baseline.
TL;DR:
- A basement bathroom costs roughly $200 to $250 per square foot, with total expenses mostly influenced by drainage setup and existing rough-ins.
- Installing an ejector pit or upflush system adds $2,000 to $5,500 and is necessary when gravity drainage isn't feasible.
- Rough-in plumbing can save a third of the budget if already present, but slab cutting and foundation issues can significantly increase costs.
- Good ventilation requires properly sized ducting and external venting, with costs affected by duct length, bends, and insulation needs.
- Permits and inspections typically add a few hundred dollars, and detailed site assessments help avoid hidden costs like foundation repairs or overlooked vent requirements.
Table of Contents
- Realistic totals and line-item cost ranges you can use to budget
- Which site conditions and choices move a quote most
- Gravity drain, ejector pit, and upflush/macerator: pros, cons, and costs
- What 'rough-in' covers vs a finished install and why bids differ
- Correct bath fan sizing, ducting to exterior, and why detail matters
- Permit fees, inspections, and code items that commonly add cost or require changes
- Realistic project schedule and a short contractor-question checklist
- Concrete, honest ways to lower cost without creating future problems
- Matt's real-job examples, common bid omissions, and how Mystic Valley scopes basement baths
- Quick decision framework: is a basement bathroom worth it?
- How Mystic Valley Home Services can help and how to request a quote
- Sources
- FAQ
Realistic totals and line-item cost ranges you can use to budget
Converting an unfinished basement corner into a bathroom costs less than building an addition, mostly because you're not moving walls or footings. Using the $200 to $250 per square foot rule, a modest 20 to 40 square foot bathroom lands somewhere around $4,000 to $10,000 before you factor in drainage complications. That range covers a basic three-piece layout: toilet, sink, and shower.

Line items vary more than the headline number suggests. A rough-in that's already in place, meaning the builder left a capped drain and vent stub during original construction, can save a meaningful chunk of that budget because you skip slab work entirely. When no rough-in exists and gravity drainage isn't possible, the ejector pit or upflush system becomes its own budget line.
A working budget usually breaks down like this:
- Rough-in plumbing (new): $1,500 to $4,000 depending on slab access and pipe runs.
- Ejector pit or upflush system: $2,000 to $5,500 when gravity drainage to the main line isn't an option.
- Fixtures (toilet, sink, shower): $800 to $3,000 depending on quality and shower type.
- Electrical (GFCI outlets, fan wiring, lighting): $300 to $900.
- Exhaust and ventilation: $250 to $800 for a properly ducted fan.
- Finishes (tile, vanity, fixtures trim): $1,500 to $5,000.
- Permits and inspections: varies by jurisdiction, typically a few hundred dollars.
Homeowners with an existing rough-in often cut their total project cost by a third or more, since slab cutting and drain routing are the most labor-intensive parts of the job. That's why two houses of the same size can get bids that differ by thousands of dollars: one already has a stub-out under the slab, and the other doesn't.
Which site conditions and choices move a quote most
Not every basement bathroom costs the same, even at identical square footage. A few conditions consistently separate a $5,000 project from a $15,000 one.
- Drainage strategy. Gravity drainage is the cheapest path when your basement floor sits below the main sewer line's invert, but most basements need help getting waste up and out, which is where pumps and macerators come in.
- Slab cutting and excavation. Breaking concrete to lay new drain lines, then patching and curing it, adds both labor and calendar time to a project.
- Vent routing complexity. A vent that has to snake around joists, ductwork, or existing plumbing to reach the roof or an exterior wall costs more to run and inspect.
- Finish level and electrical load. A tiled walk-in shower with a glass panel and a heated floor costs far more than a fiberglass shower insert, and added circuits for fans, lighting, or heated flooring add labor.
Foundation condition matters more than most homeowners expect. If a contractor finds settling, cracked footings, or water intrusion once the slab is open, that discovery can turn a plumbing job into a structural repair mid-project.
Pro Tip: Ask your contractor to inspect the slab and check for existing drain stubs before finalizing your quote, since a rough-in you didn't know about can cut your budget significantly.
Gravity drain, ejector pit, and upflush/macerator: pros, cons, and costs
Every basement bathroom drains one of three ways, and the choice affects nearly every other line item in the budget.
Gravity drainage works when your basement floor is high enough relative to the main sewer line that waste flows downhill naturally into the existing system. It's the cheapest option long-term because there's no pump to maintain, no motor to fail, and no alarm system to install. The catch is that most basements sit below that threshold, so gravity only works for a portion of homes.
An ejector pit is the traditional fallback: a sealed basin set into the slab collects waste, and a pump pushes it up to the sanitary line. Installation involves excavation for the basin, a check valve to prevent backflow, and usually a high-water alarm. Expect the system itself to run $2,000 to $5,500, and budget for periodic pump maintenance over its service life.
Upflush systems, often called macerators, grind waste and pump it through a smaller pipe, which means minimal slab cutting since the unit sits above the floor. They're a strong fit for finished basements where breaking concrete isn't practical, though they tend to have a shorter service life than a traditional ejector pump and need occasional servicing to prevent clogs.
- Gravity: lowest cost over time, but only works with the right slab elevation.
- Ejector pit: moderate upfront cost, more excavation, dependable long-term performance.
- Upflush: least invasive installation, higher maintenance frequency, shorter typical lifespan.
Whichever method you choose changes your venting and electrical needs. Pumps and macerators both require a dedicated circuit, and pit systems typically need their own vent connection separate from the fixture vents.
What 'rough-in' covers vs a finished install and why bids differ
A plumbing rough-in covers the pipes that go inside walls and under floors before anything gets covered up: supply lines, drain lines, and vent stacks, all pressure tested before an inspector signs off. Our guide to what a plumbing rough-in includes breaks down the testing requirements in more detail, but the short version is that a rough-in has to pass a pressure or trap test before drywall or flooring goes down.
A full install adds everything the rough-in doesn't: the toilet, sink, shower or tub, faucets, trim, and the final connections that make fixtures usable. Bids that quote "rough-in only" versus "complete install" can look wildly different in price for what seems like the same job, so it's worth asking exactly where the line falls.
Restoration and backfill deserve their own line in any written bid. If a contractor cuts the slab, someone has to patch and finish that concrete, and that cost sometimes gets left out of an estimate that focuses only on pipe and labor.
-
Rough-in: drain, vent, and supply lines, pressure tested, before finishes go in.
-
Full install: fixtures, trim, tile, and final connections on top of the rough-in.
-
Restoration: slab patching, subfloor repair, and finish matching after pipe work.
-
Structural crossover: when slab cutting reveals footing or foundation issues, the job can shift from plumbing scope into structural repair.
Correct bath fan sizing, ducting to exterior, and why detail matters
Ventilation is where a lot of basement bathroom budgets get shortchanged, and it's also where the consequences show up months later as mold or rot. A bath fan's rating on the box assumes ideal conditions. In practice, a fan rated at 50 CFM at 0.1 inches of static pressure may only deliver 23 to 31 CFM once it's fighting real duct length and bends at 0.25 inches of pressure. That gap is why sizing a fan off the box number alone tends to undersize actual airflow.
A basic bath fan install runs $250 to $800, and the price climbs with duct length, insulation requirements, and how far the fan has to travel to reach an exterior wall or roof. Department of Energy installation guidance calls for the shortest possible duct run, proper support, sealed connections, and insulation on any duct that passes through unconditioned space.

Basement bath fans rated at 50 CFM can deliver as little as 23 to 31 CFM once real duct pressure is factored in, which is why Building America guidance on exhaust fans recommends specifying performance at actual operating pressure rather than the label rating alone.
Venting into an attic or crawlspace instead of straight outdoors is a shortcut that shows up later as moisture damage, since that warm, humid air has nowhere to go but into the surrounding building cavities.
Pro Tip: Ask your contractor for the fan's CFM rating at 0.25 inches of static pressure, not just the box number, since that's closer to what you'll actually get once the duct is installed.
Permit fees, inspections, and code items that commonly add cost or require changes
Most jurisdictions require at least three plumbing inspections on a basement bathroom: a rough-in inspection before walls close up, a pressure or trap test, and a final inspection once fixtures are connected. Permit fees vary enough by city and county that it's worth checking with your local building department before you finalize a budget. Our guide to how plumbing inspections work walks through what inspectors typically check at each stage.
Air admittance valves come up often in basement projects because they can simplify venting where running a full vent stack to the roof is impractical. ICC code guidance specifies that AAVs must be installed after the drain, waste, and vent system passes testing, and they need to stay accessible for replacement. They don't universally replace an exterior vent requirement, so confirm with your local code office before counting on one.
- Rough-in, pressure/trap test, and final inspection are the standard three-stage sequence.
- AAVs must go in after DWV testing and stay accessible, per ICC code notes.
- Vent termination location rules vary locally and are a common source of failed inspections.
- Ask your contractor to show you the pulled permit and share inspection results as they happen.
Realistic project schedule and a short contractor-question checklist
A straightforward basement bathroom, from site prep through final inspection, typically takes two to four weeks. Site prep and rough-in usually take three to seven days depending on whether slab cutting is involved. Mechanical and electrical work adds another two to four days, finishes take the longest at one to two weeks, and inspections add a few days of waiting between phases.
Before signing a contract, ask these questions:
- What drainage method are you proposing, and why does it fit this basement?
- If a pump is involved, what model and basin size, and what's the warranty?
- Who's responsible for restoring the slab and matching existing flooring?
- Who pulls the permit, and can I see the inspection results at each stage?
- What's your testing procedure for the rough-in before it's covered up?
Compare quotes by drainage method and included restoration rather than by the bottom-line number alone, since two bids using different methods aren't really quoting the same job.
Pro Tip: A bid that skips permit mention entirely, or that's vague about how the vent terminates outside, is worth a second look before you sign anything.
Concrete, honest ways to lower cost without creating future problems
The cheapest basement bathroom is one that works with what's already there instead of fighting it.
- Reuse an existing rough-in or nearby supply and drain locations whenever the layout allows it.
- Choose a simpler shower, like a fiberglass insert instead of a full tiled and glassed enclosure, to cut finish labor significantly.
- Consider an upflush system where slab cutting would otherwise be extensive, since it avoids excavation costs entirely.
- Bundle the bathroom with other basement work, like a sump pump upgrade, to share a single contractor mobilization fee.
Matt's real-job examples, common bid omissions, and how Mystic Valley scopes basement baths
The projects that go over budget almost always hinge on drainage. A basement with an existing rough-in and a job that needs a new ejector pit can differ by thousands of dollars for what looks like the same bathroom on paper. The bids that come in suspiciously low tend to skip the same things: exterior duct termination, insulation on ducts running through unconditioned space, and sealing around penetrations. Those omissions don't show up as problems until the following winter. Our guide to how basement plumbing works covers the drainage side in more depth for readers who want the technical background before getting quotes.
Quick decision framework: is a basement bathroom worth it?
A basement bathroom earns its cost when it adds real convenience, like guest privacy or a home gym or in-law setup, or supports resale in a home where a second full bath is scarce. It's worth delaying when drainage costs come back disproportionately high or when opening the slab reveals foundation concerns. Prioritize proper drainage and ventilation over the lowest bid.
— Matt
How Mystic Valley Home Services can help and how to request a quote
Getting the drainage method right the first time saves you from repeat trips and slab rework down the line, and that's the part of a basement bathroom bid that's easiest to get wrong. Our team handles the full scope, from rough-in plumbing and ejector pit installation to fixture installs and properly ducted exhaust ventilation.

A Mystic Valley estimate starts with a site visit so we can see the slab, existing rough-ins, and vent access before quoting anything. From there, you get:
- A written scope that names the drainage method and any pump or macerator model.
- Permit handling included, with inspection records shared as the job progresses.
- Transparent upfront pricing before work starts, with no surprise line items later.
If you're planning a basement bathroom, request a visit through our plumbing services page and we'll walk the space with you before you commit to a number.
Sources
- Look at exhaust fans venting outside — Building America Solution Center
- Install exhaust fan flex duct (bath fan only) — U.S. Department of Energy
- How Much Does It Cost to Put a Bathroom in the Basement? (2026) — HomeGuide
- CodeNotes: Installation of air admittance valves — ICC
FAQ
Is it worth it to put a bathroom in the basement?
It's often worth it when the space adds real household function, like a guest suite or home office bathroom, or when a second full bath is scarce in the local resale market. It's worth pausing if drainage or foundation issues push the cost well past a typical conversion budget.
How much does it cost to install a 3-piece bathroom in a basement?
A basic three-piece basement bathroom, toilet, sink, and shower, typically falls within the $200 to $250 per square foot conversion range, putting a small bathroom around $4,000 to $10,000 before drainage add-ons. An ejector pit or upflush system, when needed, adds $2,000 to $5,500 on top of that.
What is the most expensive part of finishing a basement?
For a basement bathroom specifically, drainage work is usually the biggest cost swing, especially when slab cutting and an ejector pit or upflush system are required. Finish level, particularly tile work and shower enclosures, is the next largest variable.
What's the most expensive part of a bathroom renovation?
In a basement setting, the drainage strategy tends to outweigh fixture and finish costs, since gravity drainage, an ejector pit, and an upflush system carry very different price tags for the same layout. Ventilation and electrical work add smaller but consistent costs on top of whichever drainage method is chosen.